How it all started
When I first bumped into Sketchup some time ago, it immediately got me hooked. Not that I was new to 3D, but its ease of use, intuitive interface and philosophy just impressed me to a degree that seldom happened in those past many years of my computer wandering. It’s just not every day that one can stumble in such a nice piece of software which by the way is free.
When some weeks ago my eldest daughter got an assignment in school to build a simple model with Sketchup, it enticed me to start a project to demonstrate my kids the possibilities of the program. Since I’m fond of medieval stuff and had already taken my kids to visit several European castles, which didn’t fail at captivating them just as it did with me when I was a small child, I choose to build some sort of castle.
Where to begin ?
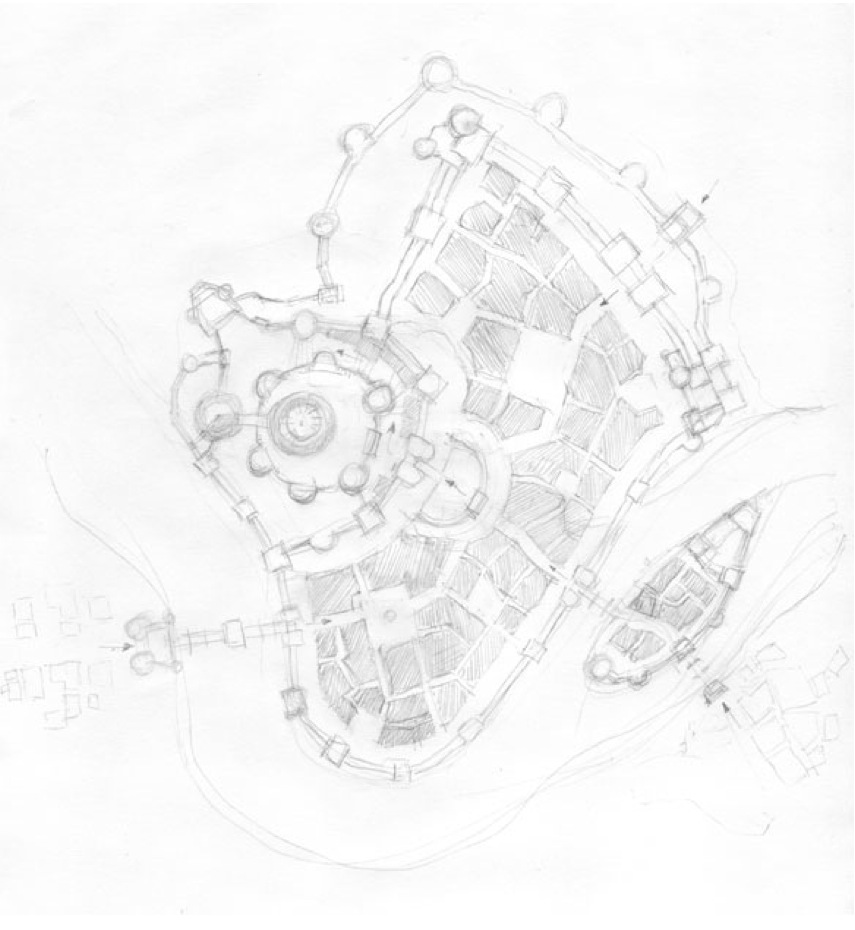
So, I sat down at my computer and thought it would be nice to build a small city with fortified walls and a castle attached. For that I needed some kind of planning, a map would be great I thought and I started drawing a top down map of a fictional medieval city on a sheet of paper. A river was definitely a great feature to incorporate and here is the resulting sketch. Once finished, I scanned the drawing to use it as a reference in Sketchup.
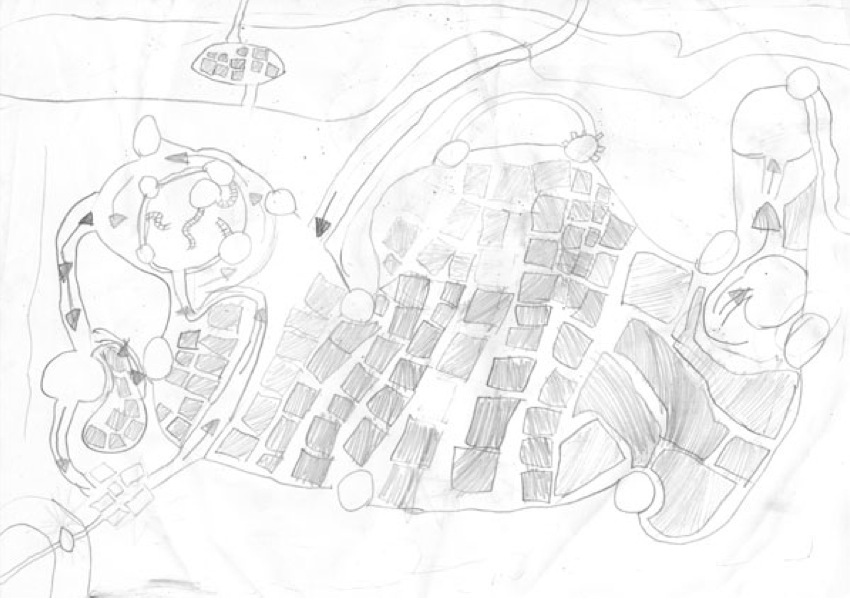
In the meantime, my youngest daughter, who never looses an occasion to draw, picked up some paper and decided to do just like daddy and did her own town planning. Here’s her own version:
The starting process
Now that I got a general idea of the project, I imported the drawing in Sketchup and placed it as a picture on the ground plane. First step was to setup the scale for the document: Window->Model Info->Units, I always work in decimal because that’s what I’m used to. I then zoomed in to a section of the drawing for which I had a fairly good idea of the real size it should have. Using the measure tool, I measured and entered the target size I wanted to achieve on the keyboard and validated the resize model dialog box. I now had a scaled floor-plan to work from.
The next step was probably the most exhilarating one. It only took a few minutes to draw the overall geometry of the castle walls and towers on top of the drawing and with the push tool (God bless the push tool and anyone who invented it) the whole structure came to life out of the ground as giant mushrooms. This is the part where one can really get excited and go too fast. Popping stuff out of the ground is so much fun that you easily go way over the top and realize after a moment that you’ve raised so many blocks at once that it makes it too complicated to actually edit them. No worries, just step back a little and limit yourself to a specific zone.
For this project, I decided to concentrated on the castle first and ignore the town altogether for the moment. Once all the structure of the castle had been raised to the appropriate height, I started editing some details: battlements of the walls to get an overall feel of the scale and check for accuracy of the model.
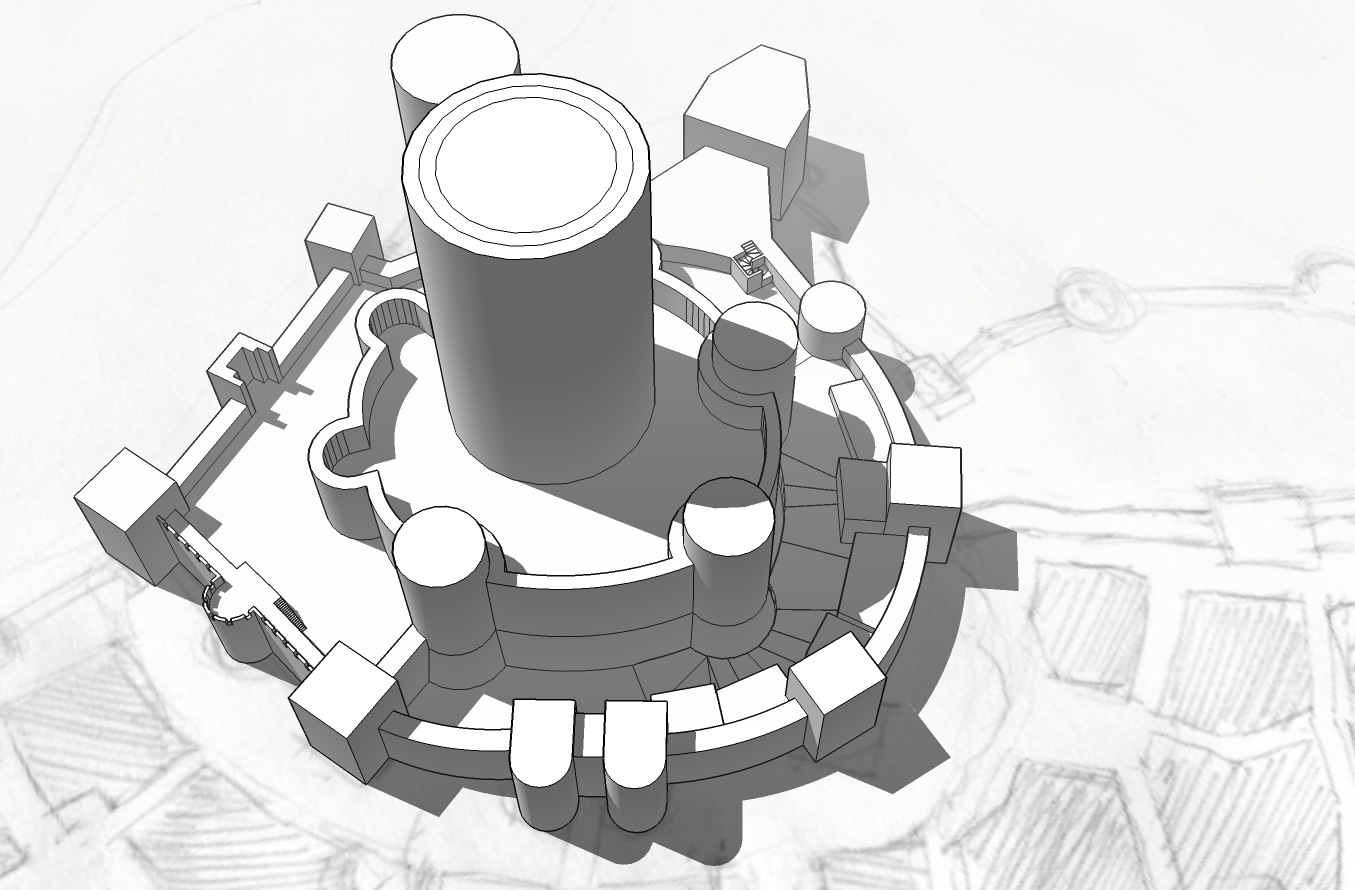
Then, as anyone who get excited by its own progress, I decided I had to work on the most visible structure of it all, namely the donjon.
As you can see, I’m a guide freak: I love guides and I make extensive use of them. I found that they where extremely useful for just about everything in Sketchup, from building geometry to checking for alignment and visual clues. I sometime overuse them, especially at the begining of that project (as you can see in the picture above) since I was still fairly new to Sketchup, but hey, no problem: Edit->Delete Guides will fix that up in case.
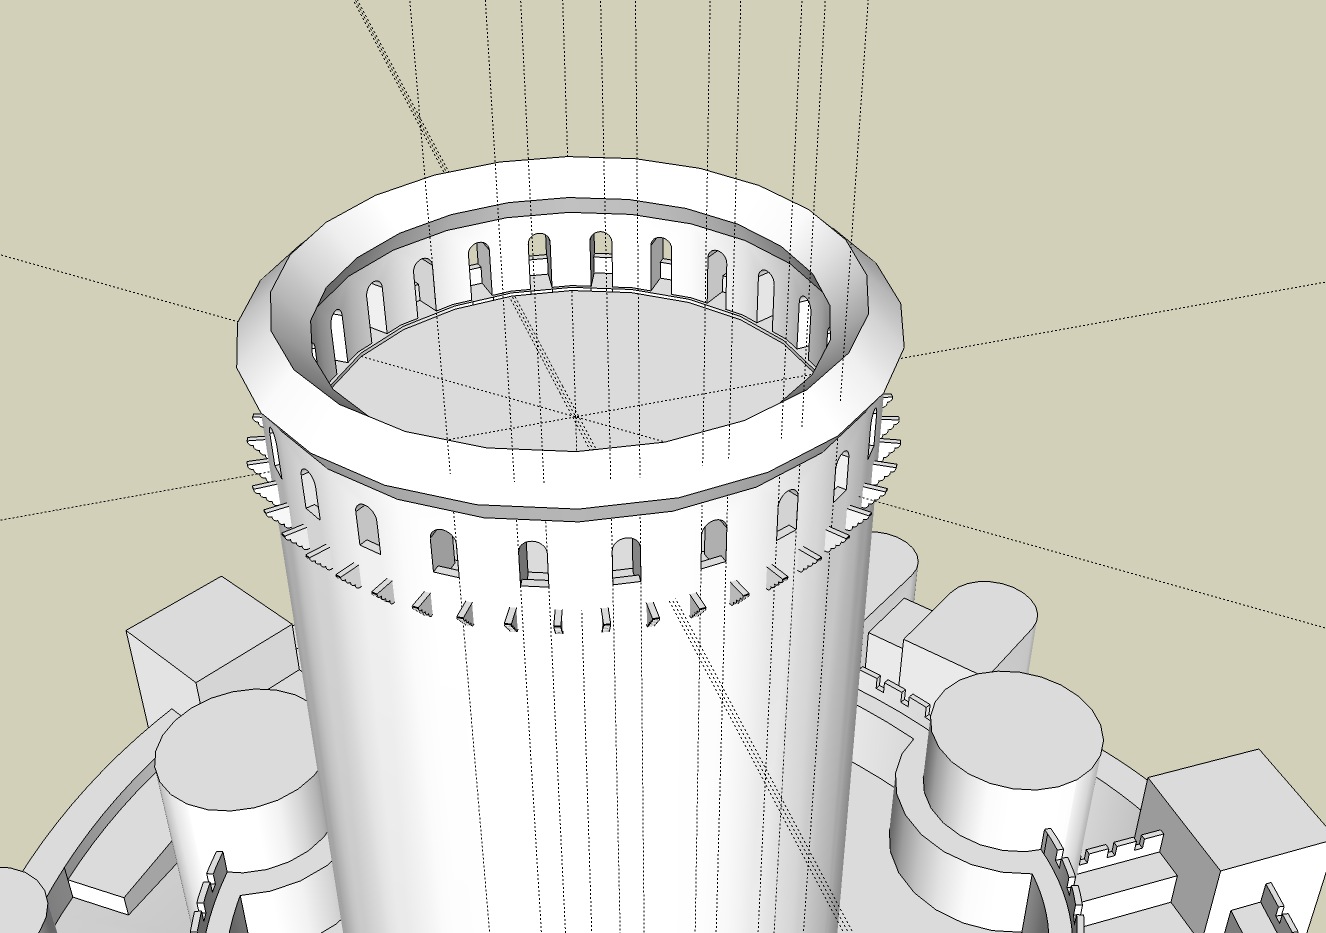
Positioning the last bits of the tower top (the hanging stones under the windows) was a bit tricky since they had to be spaced evenly between themselves and inline with the windows openings. After a bit of calculation and the two first ones properly placed, a simple rotate duplicate took care of the rest.
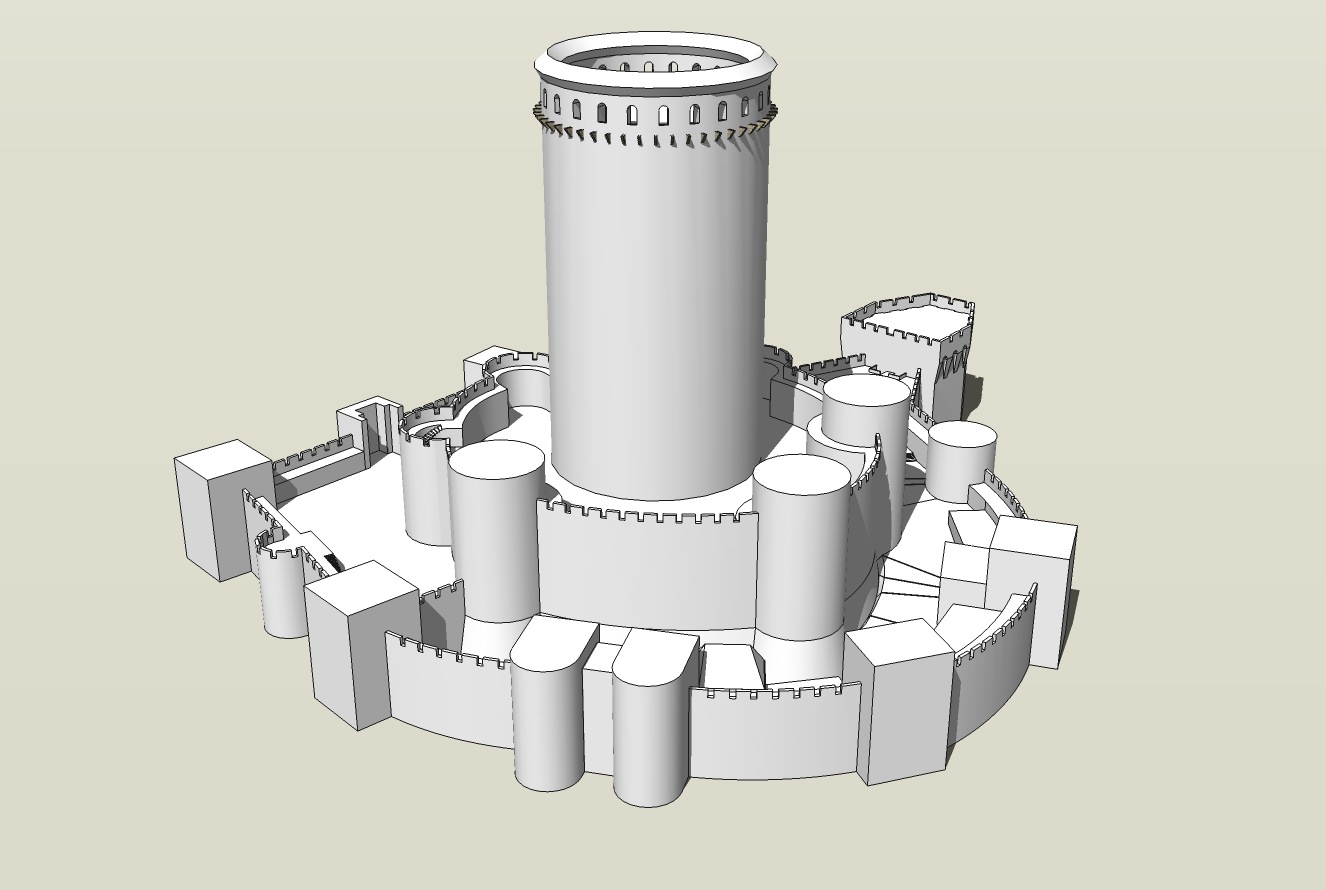
After finishing the donjon top, I went back to the walls, finishing the battlements (very repetitive but never quite the same) which in the case of the curved walls was really painful. Because I’m very much attached to details and accuracy, it was impossible to use some pre-made meaningful component because, as mentioned some walls are curved and none of them have the same curvature (damn I should have foreseen that while drawing). Furthermore, as the walls have all different length, it was uneasy to use some component because the placement of the end of the battlement would have been unpredictable and I could not finish with the lower part of the battlement leaning on the tower wall. That’s just the type of detail that’s crying out loud I love medieval castle but I really don’t know much about it
. I could have made a component and then scale it but then the overall shape of the battlement would have been distorted in some case to some stupid proportions. Now, if I had Sketchup Pro that would be an entirely different deal because I could then build a Dynamic Component that would take care of that problem but I’m stuck with the regular version of Sketchup at the moment.
After finishing all the battlements, it was time to start editing the towers. Since several of them shared the same diameter or shape, it was possible to build a top component for each size and then duplicate those components. The whole process was a lot faster than with the walls. Within those components, I also used some smaller component like the roof masts that are identical in all roofs independently of the size of the tower. One nice thing with component is that you can alter them from outside individually without affecting the actual inner geometry of the component. This is how I made the two masts on the castle main gate towers with different size by scaling vertically the component without editing the geometry which remains identical to the others.
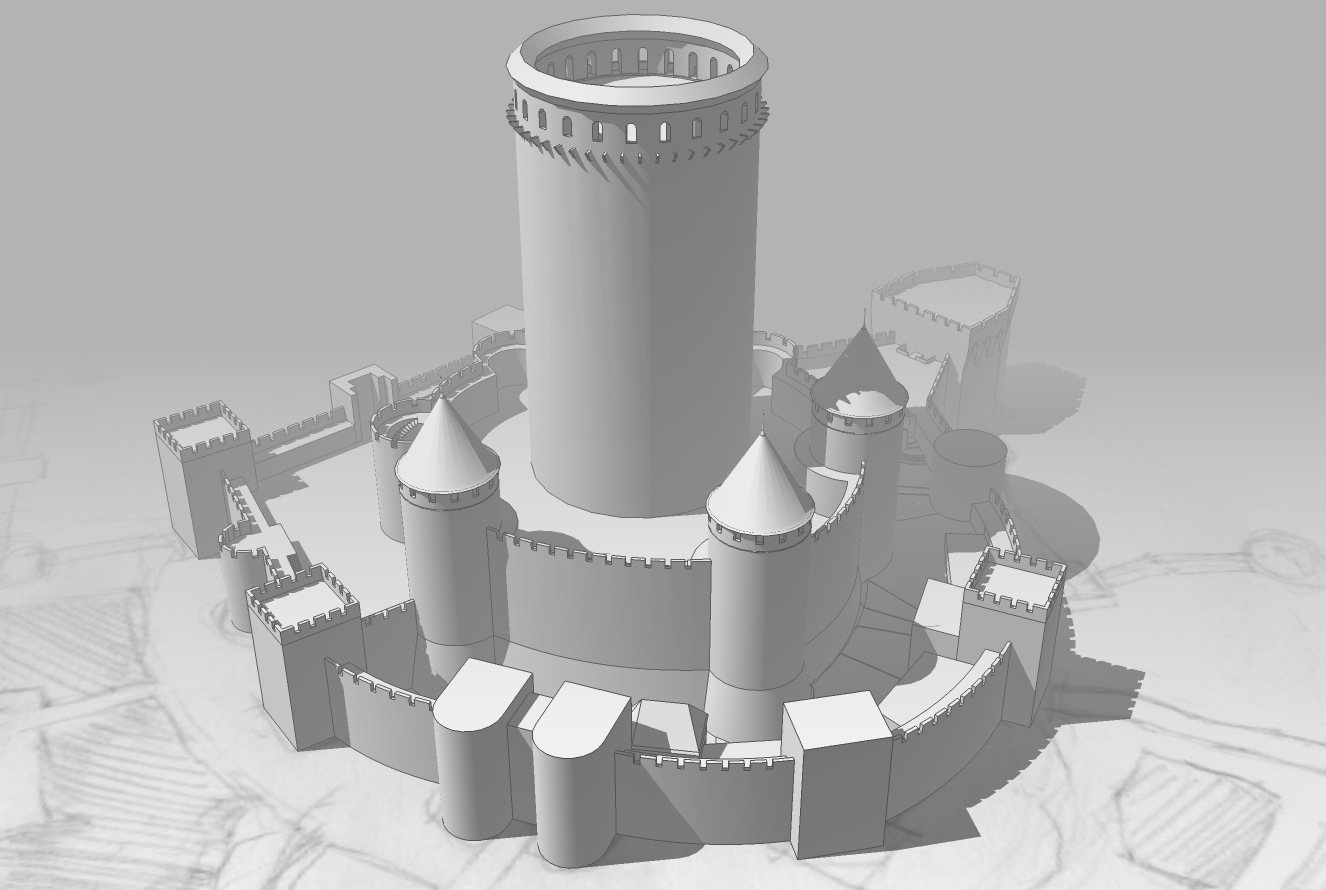
All the towers are done except the two of the main gate. Added a arched bridge between the large tower and the donjon, this is probably the only fantasy I afforded so far in the model, and while it would have been technically possible, it would have been most unlikely in a real medieval castle. But let’s please ourselves.
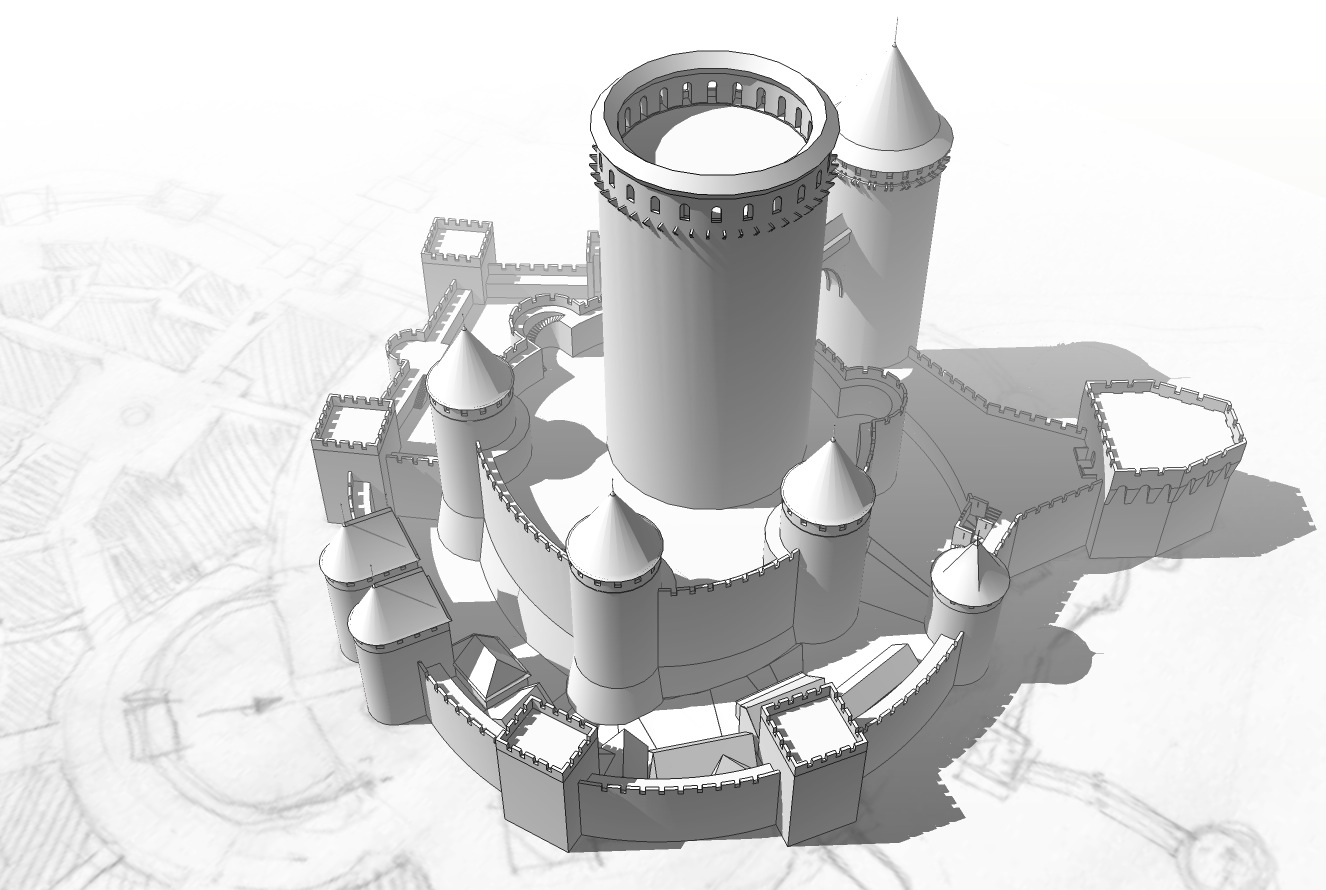
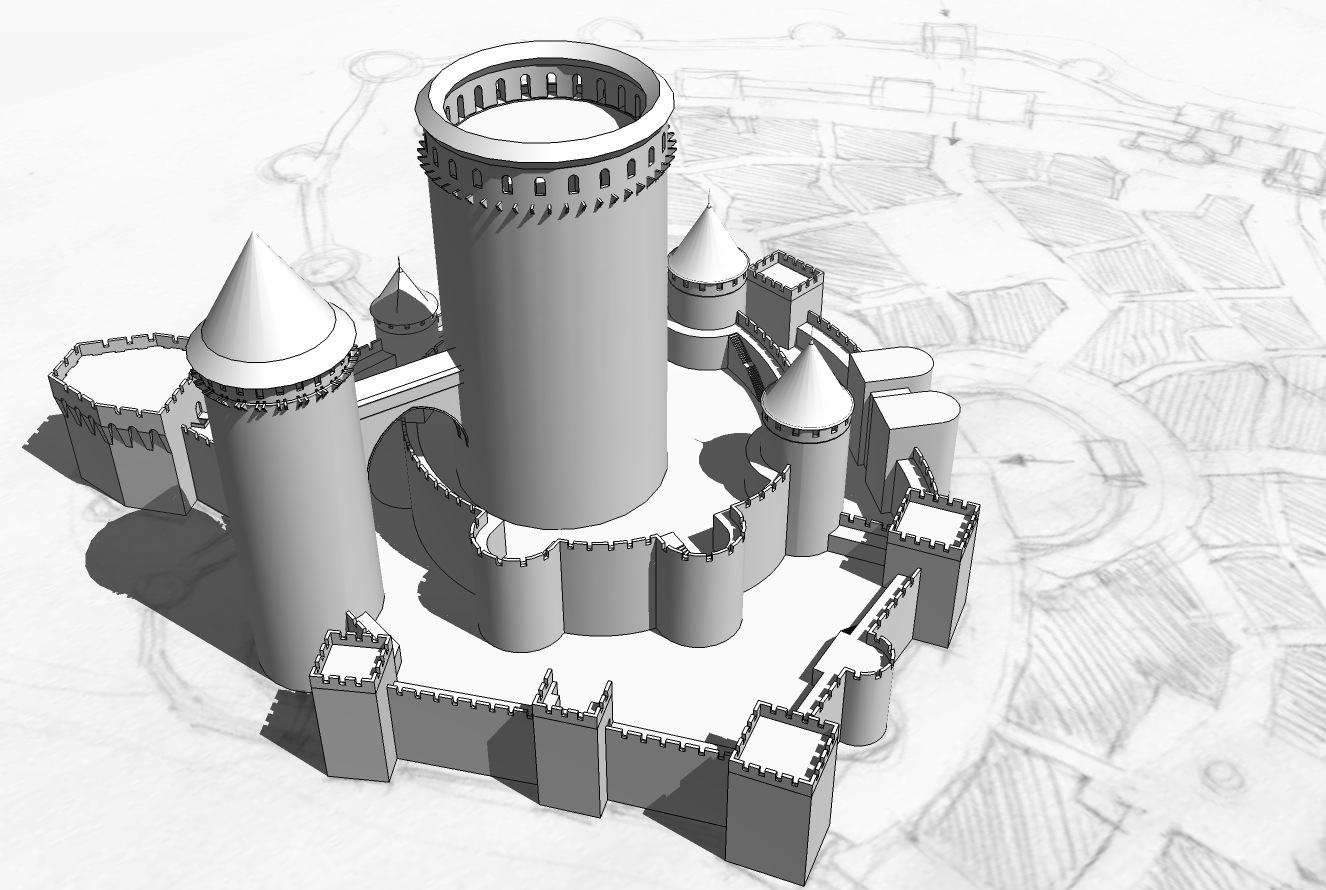
Main gate towers top completed with roof. Finished the houses on the way up the the donjon.
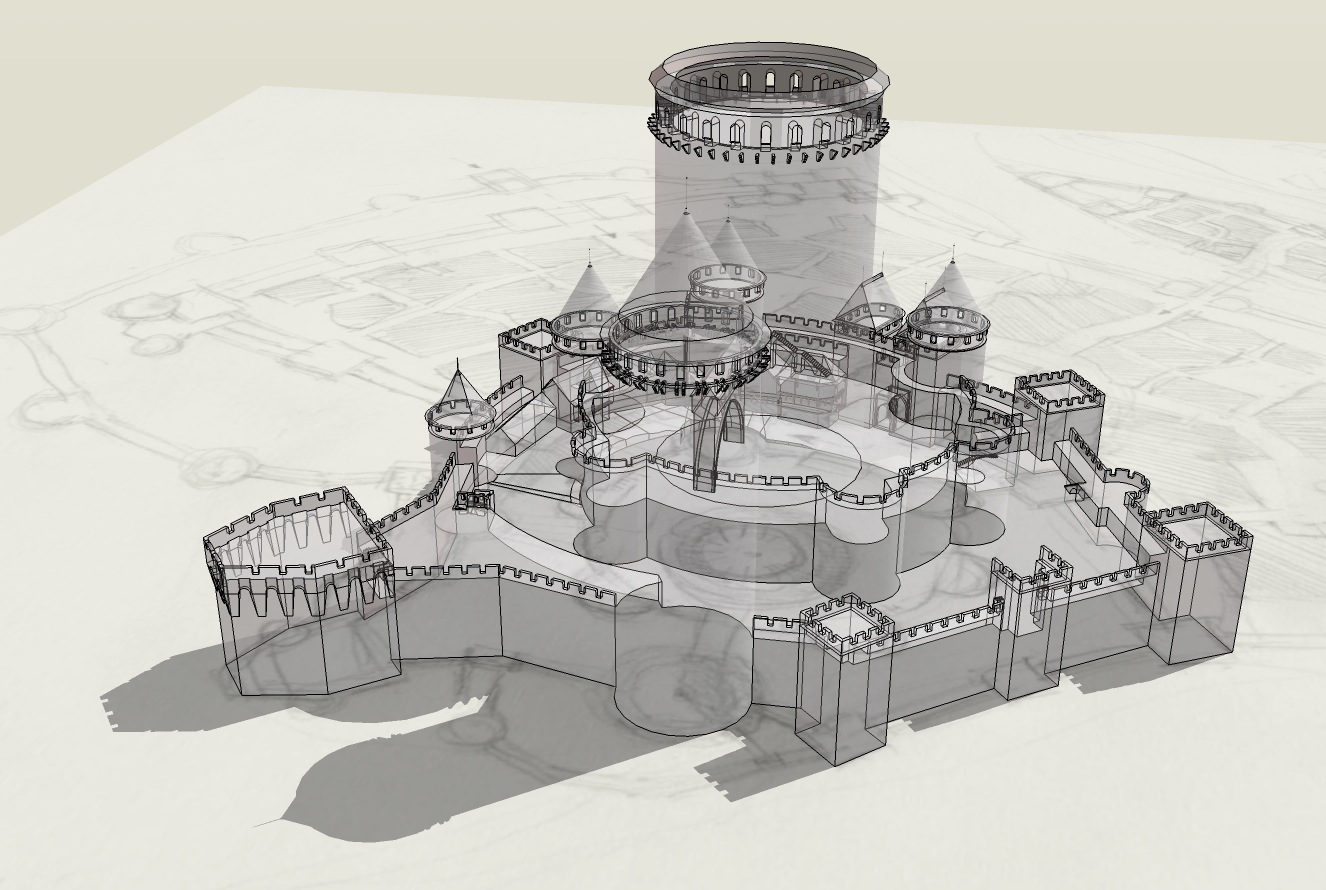
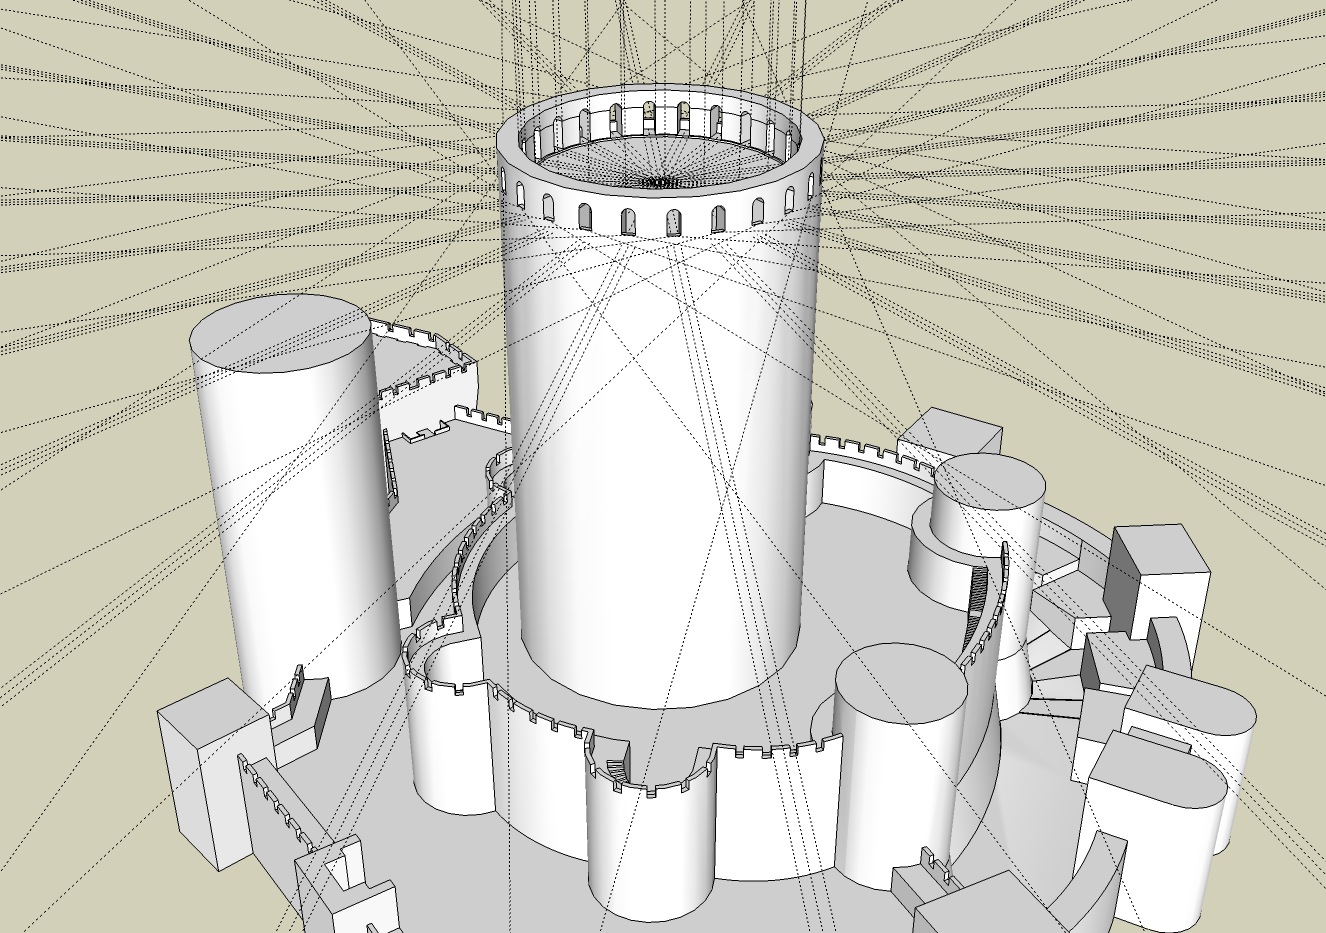
Xray view of the whole geometry.
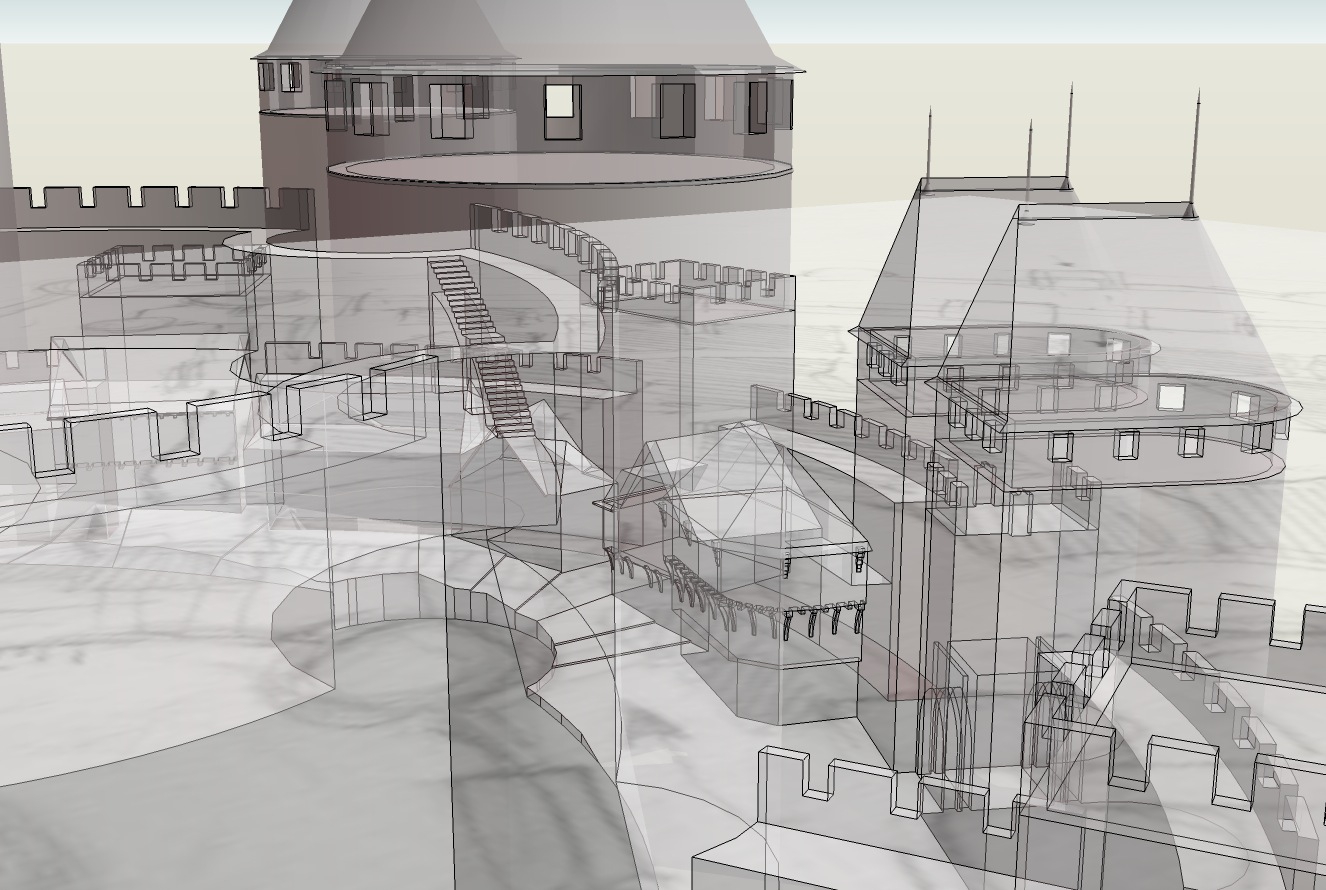
Detail Xray with a view on the houses leaning against the wall near the entrance of the castle.
(to be continued…)
Very Interesting post, looking forward to seeing more pictures. I’m trying to make a round Middle Eastern tower with curved crenellations so I was looking at your battlements for inspiration……I’m still stuck, I’m trying to make a component, I’m off to experiment a little more after seeing your work.
Thank you. I found that making any curved component match any curved geometry is hard in Sketchup because of the nature of the Sketchup curves: they are smaller lines placed to give the illusion of a curve. So it is challenging to make an acceptable match between two geometries with similar curve but different scale (the object and the smaller component). Let me know if you find any solution.